The next update will be posted on monday, 1 september.
It will include a step by step tutorial explaining how I paint the Dark Angels chapter symbol and squad / company markings on my miniatures.
See you then!
/Stitch
In the mean time, please leave a comment, or e-mail me at stitch [at] roll2dice [dot] com.
Tuesday, 5 August 2008
Tip: Lean the paint pots, avoid messy spills
To avoid messy spills, when I open a pot to lock the lid in place, I tip it forward to make the paint drop into the pot, instead of outside the rim of the pot. This is especially common with the new paint pots from Games Workshop, such as the Foundation Paints, when you open them all the way.
Similarly, I always lean the open paint pot on a brush when I'm painting, to keep the paint inside the pot.

Similarly, I always lean the open paint pot on a brush when I'm painting, to keep the paint inside the pot.
Painting Tutorial: Dark Angel Space Marine
[7 Aug: I found out the pictures were much too dark on CRT monitors, and some people (including me, on another computer!) couldn't see the difference between the black and the green... Ooops... :) Anyway! Now I've tweaked the brightness and contrast and uploaded new pictures, so hopefully they will make a little more sense for those of you with darker displays. Please let me know if you still have problems with the pictures!
Because of my love for the Dark Angels, I've always used their Codex. But I haven't painted my marines as Dark Angels. Instead, I've made up a few Successor Chapters during the years. Why? The paints! Both Dark Angels Green and Blood Red gives lousy coverage on a black undercoat, and I just couldn't be bothered with thinning the paint and painting 17 layers on each miniature.
Even so, with my own colour schemes, I've never finished an army. I've always tweaked the color scheme, or changed the chapter symbol, etc, etc... Now though, I've finally decided to paint actual Dark Angels, thanks to the Foundation Paints.
The Foundation Paints are awesome, and the two main colours I use are Orkhide Shade and Mechrite Red. Orkhide Shade covers black in one coat. Mechrite Red doesn't cover as good, but it still only needs two coats.
I won't go into detail on different techniques, as it is beyond the scope of this tutorial. If you do not already know what Drybrushing is, for example, I sincerely recommend the book How to Paint Citadel Miniatures from Games Workshop. It explains all these techniques better than I ever could.
Please note that this tutorial is about painting an army, not winning painting competitions. I'm not even close to a Golden Daemon standard miniatures painter, and neither do I aspire to be one. The important thing for me with my miniatures is that they look good on the table, and that means they only have to look good at arms length.
So, here is how I paint my Dark Angels, step by step:
Just a note on brushes and paints. Unless otherwise noted, all paints and brushes used in this tutorial are from Citadel/Games Workshop. You are, of course, free to use whatever painting supplies you like, but it's worth mentioning for the purpose of brush size, for instance.
Now, let's get down to business!

I won't go into more detail, but I'll just mention that I always glue any basing material (sand, grit, etc) to the base before undercoating. The spray paint will help hold the material in place, so it doesn't come off during painting. After finishing the undercoat with some Chaos Back paint and a Standard brush from GW, filling in the areas missed by the spray, it's time for the base coat. Read on.
Don't worry if you cover some of the detail up. When the marine is on the table with his brothers, no one will notice!

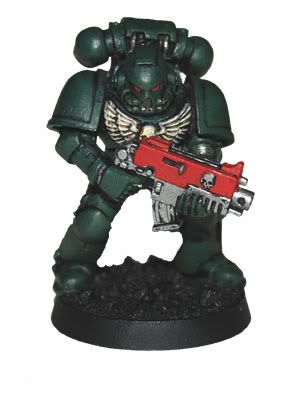
When finished, the marine should look something like this:
When the Bolter is not attached to the arm (such as with some of the Dark Angels Upgrade bits), I usually don't glue it in place until after painting. This makes it easier to paint the chest of the marine. Remember to use a water based glue when you glue the Bolter in place, as plastic glue (poly cement) can dissolve and smear the paint, and super glue can leave ugly traces if you get it in the wrong place.
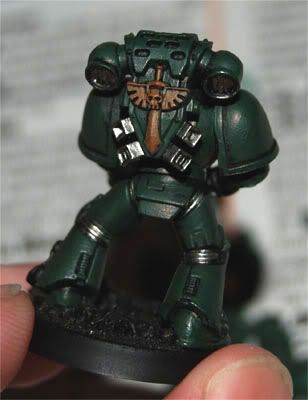
Back:
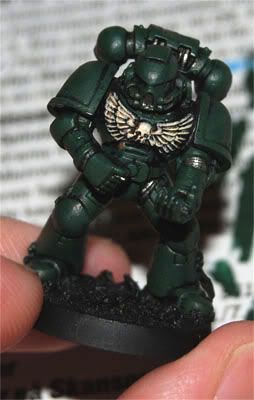
Front:
Overbrushing is great for the Bolter as well, leaving some black showing for the deeper shading:
Don't worry if you get some Boltgun Metal in the wrong place. We will take care of that in Step 8: Touch-up.
Back:
Now, drybrush the same details with Bleached Bone. A few thinner coats is better than a thick one. You want some of the brown and black to show through:
And the back again:
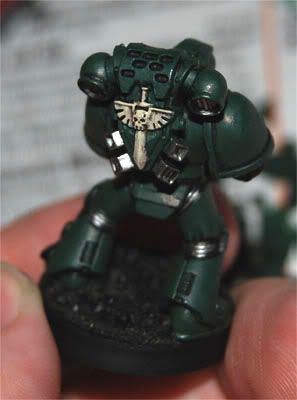
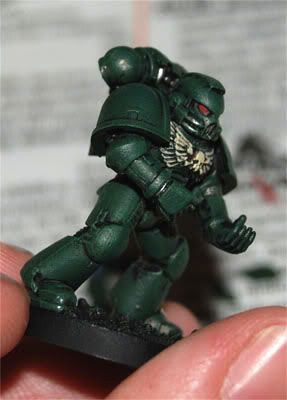
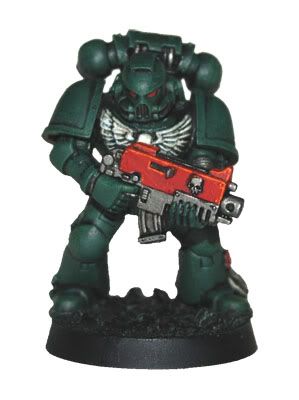
After Step 8, this is what we've got so far:
Not bad, if I say so myself. In fact, if you're happy with this, just skip the rest of the steps. Together with an army painted in the same way, this guy would look good on a table as he is.
I'm not entirely satisfied, though.
Now, when I say lightly, I mean it. I just want a hint of a lighter green on the edges of the armour. And, when I say almost the entire model, I mean you need to take care not to discolour the chest eagle and other non-green details.
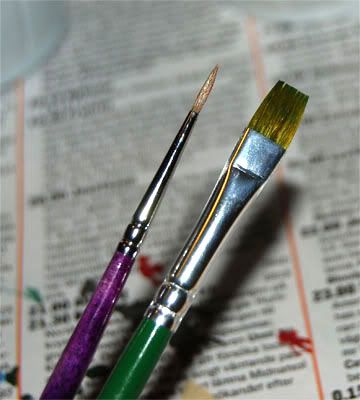
The brush I use for this step is a cheap, but decent quality, brush with synthetic bristles. (The brush on the left is a Standard brush, shown for size comparison.)
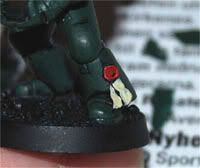
I highlight the red areas, such as the Bolter casing, with Macharius Solar Orange. To do this, I thin the paint just a bit and carefully brush it along the edges of the areas to be highlighted. I also apply some Macharius Solar Orange on the raised rivets to make them pop out just a bit.
I carefully drybrush the chest eagle and other bone details with Skull White. Not all over, just a bit to give it a little extra highlight.
After the metal bits, the entire purity seal gets the same treatment. Feel free to leave a little pool of Badab Black in the middle of the wax seal, to give it some extra depth.
Almost done!
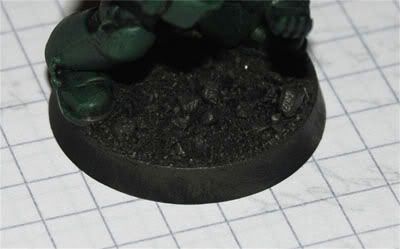
I start with overbrushing the top of the base with Charadon Granite.
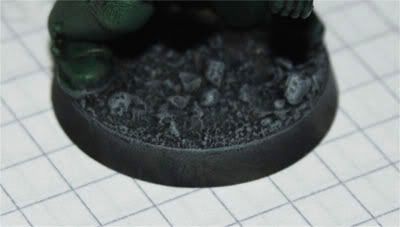
I then apply a heavy drybrushing of Adeptus Battlegrey, followed by a lighter drybrushing with Codex Grey, and finally a light drybrushing with Fortress Grey.
If, during any of these stages, I get any grey paint on the marine's feet, I just let it be, unless I really make a mess. After all, he's walking around in it, it's only reasonable that some of it is going to stick to his boots.
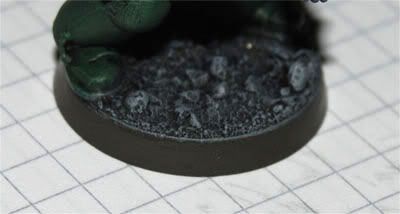
After this, all that is left is the edge. Using a Standard brush, I apply a generous coat of Charadon Granite all along the edge, taking care to leave the drybrushed top edge.
That's it!

Thanks for reading. Please join me next month for a step by step tutorial on how I paint the Chapter symbol and squad markings!
If you like or dislike this article, please leave a comment and let me know!
You can also e-mail me at stitch [at] roll2dice [dot] com.
/Stitch
Because of my love for the Dark Angels, I've always used their Codex. But I haven't painted my marines as Dark Angels. Instead, I've made up a few Successor Chapters during the years. Why? The paints! Both Dark Angels Green and Blood Red gives lousy coverage on a black undercoat, and I just couldn't be bothered with thinning the paint and painting 17 layers on each miniature.
Even so, with my own colour schemes, I've never finished an army. I've always tweaked the color scheme, or changed the chapter symbol, etc, etc... Now though, I've finally decided to paint actual Dark Angels, thanks to the Foundation Paints.
The Foundation Paints are awesome, and the two main colours I use are Orkhide Shade and Mechrite Red. Orkhide Shade covers black in one coat. Mechrite Red doesn't cover as good, but it still only needs two coats.
I won't go into detail on different techniques, as it is beyond the scope of this tutorial. If you do not already know what Drybrushing is, for example, I sincerely recommend the book How to Paint Citadel Miniatures from Games Workshop. It explains all these techniques better than I ever could.
Please note that this tutorial is about painting an army, not winning painting competitions. I'm not even close to a Golden Daemon standard miniatures painter, and neither do I aspire to be one. The important thing for me with my miniatures is that they look good on the table, and that means they only have to look good at arms length.
So, here is how I paint my Dark Angels, step by step:
- Undercoat
- Base coat
- Bolter casing
- Metal bits
- Chest eagle + skulls
- Purity seals
- Eye-lenses
- Touch-up
- Highlighting
- Shading metal bits + purity seals
- Finishing touches on purity seals
- The base
Just a note on brushes and paints. Unless otherwise noted, all paints and brushes used in this tutorial are from Citadel/Games Workshop. You are, of course, free to use whatever painting supplies you like, but it's worth mentioning for the purpose of brush size, for instance.
Now, let's get down to business!
1. Undercoat
I use a black undercoat for my Dark Angels. As you will see later on, this creates almost all the shading I need. Nowadays I almost exclusively use Matt Black Primer from The Army Painter, but Games Workshop's Chaos Black will work just as well.I won't go into more detail, but I'll just mention that I always glue any basing material (sand, grit, etc) to the base before undercoating. The spray paint will help hold the material in place, so it doesn't come off during painting. After finishing the undercoat with some Chaos Back paint and a Standard brush from GW, filling in the areas missed by the spray, it's time for the base coat. Read on.
2. Base coat
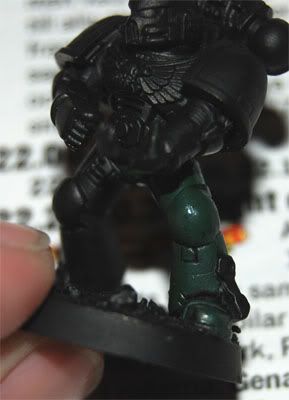
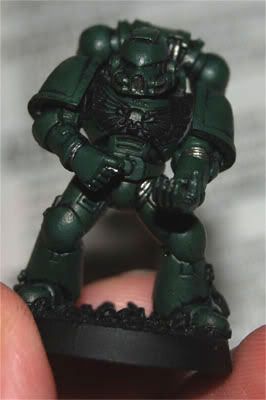
Overbrushing is basically the same as drybrushing, but with more paint in the brush. By using this technique, you can still see the black in the recesses of the armour. The base coat is all Orkhide Shade, straight from the pot. I seldom thin my paints, and I almost never mix paints. For this step, I use a Standard brush.Don't worry if you cover some of the detail up. When the marine is on the table with his brothers, no one will notice!
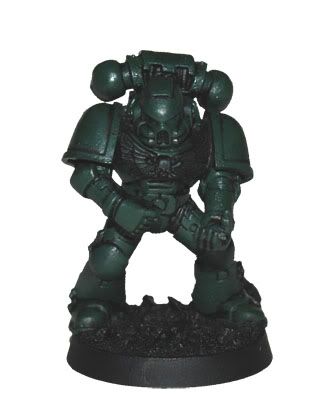
When finished, the marine should look something like this:
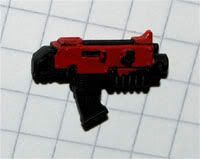
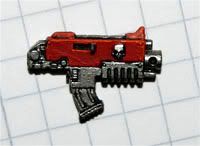
3. Bolter casing
For this step, I use a Detail brush. I paint the casing of the bolter with Mechrite Red. Two coats will do nicely. Take care to let the black show in the recesses. But, again, if you cover some of the detail, don't worry about it.When the Bolter is not attached to the arm (such as with some of the Dark Angels Upgrade bits), I usually don't glue it in place until after painting. This makes it easier to paint the chest of the marine. Remember to use a water based glue when you glue the Bolter in place, as plastic glue (poly cement) can dissolve and smear the paint, and super glue can leave ugly traces if you get it in the wrong place.
4. Metal bits
Using a Detail brush, I paint all metal areas with Boltgun Metal. This means most of the joints of the armour, plus exhausts on the backpack, etc.Back:
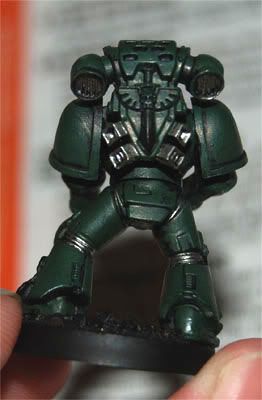
Front:
Overbrushing is great for the Bolter as well, leaving some black showing for the deeper shading:
Don't worry if you get some Boltgun Metal in the wrong place. We will take care of that in Step 8: Touch-up.
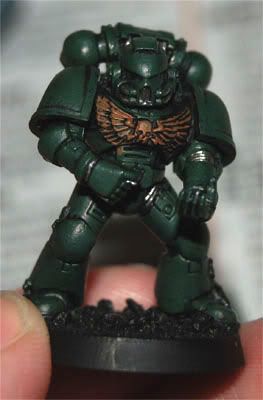
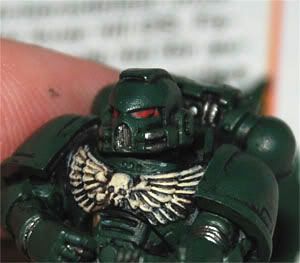
5. Chest eagle + skulls
Overbrush the chest eagle and any skulls, etc, with Calthan Brown, again leaving some black showing.Back:
Now, drybrush the same details with Bleached Bone. A few thinner coats is better than a thick one. You want some of the brown and black to show through:
And the back again:
6. Purity seals
Paint the wax Mechrite Red. It's ok to leave some black showing along the inner edge. Paint the parchment Bleached Bone. You may need to apply two or even three coats.7. Eye lenses
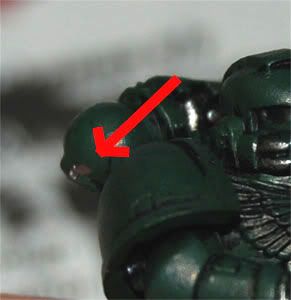
The eye-lenses get a thin coat of Mechrite Red with a Fine Detail brush. Take care to leave some black around the edges. This is usually one of the few steps where I thin the paint slightly, taking care to only use the very tip of the brush.8. Touch-up
This is where I fix the base coat by covering up all the little mistakes I've made along the way, such as the backpack shown under Step 4: Metal, and the eye shown just above this paragraph.After Step 8, this is what we've got so far:
Not bad, if I say so myself. In fact, if you're happy with this, just skip the rest of the steps. Together with an army painted in the same way, this guy would look good on a table as he is.
I'm not entirely satisfied, though.
9. Highlighting
Using a large brush, I now lightly drybrush almost the entire model with Gnarloc Green.Now, when I say lightly, I mean it. I just want a hint of a lighter green on the edges of the armour. And, when I say almost the entire model, I mean you need to take care not to discolour the chest eagle and other non-green details.
The brush I use for this step is a cheap, but decent quality, brush with synthetic bristles. (The brush on the left is a Standard brush, shown for size comparison.)
I highlight the red areas, such as the Bolter casing, with Macharius Solar Orange. To do this, I thin the paint just a bit and carefully brush it along the edges of the areas to be highlighted. I also apply some Macharius Solar Orange on the raised rivets to make them pop out just a bit.
I carefully drybrush the chest eagle and other bone details with Skull White. Not all over, just a bit to give it a little extra highlight.
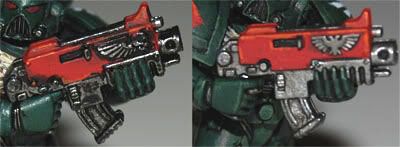
10. Shading metal bits + purity seals
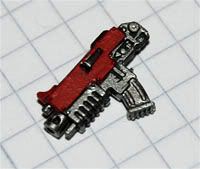
In this step, all metal bits get a coat of Badab Black wash. I really like the new Citadel washes. You can see why in the picture below. That's the old Black Ink on the left Bolter, and Badab Black on the right.After the metal bits, the entire purity seal gets the same treatment. Feel free to leave a little pool of Badab Black in the middle of the wax seal, to give it some extra depth.
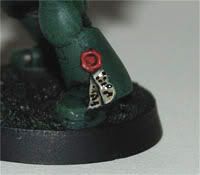
11. Finishing touches on purity seals
After I am sure that the Badab Black wash is completely dry, I highlight the wax with some more Mechrite Red along the edge and in the middle. I then scribble some wavy lines and dots on the parchment with a black fineliner pen.Almost done!
12. The base
Unfortunately, due to the blue light of the camera flash, the pictures of this step didn't come out so well, but I'm sure you get the idea.I start with overbrushing the top of the base with Charadon Granite.
I then apply a heavy drybrushing of Adeptus Battlegrey, followed by a lighter drybrushing with Codex Grey, and finally a light drybrushing with Fortress Grey.
If, during any of these stages, I get any grey paint on the marine's feet, I just let it be, unless I really make a mess. After all, he's walking around in it, it's only reasonable that some of it is going to stick to his boots.
After this, all that is left is the edge. Using a Standard brush, I apply a generous coat of Charadon Granite all along the edge, taking care to leave the drybrushed top edge.
That's it!
Thanks for reading. Please join me next month for a step by step tutorial on how I paint the Chapter symbol and squad markings!
If you like or dislike this article, please leave a comment and let me know!
You can also e-mail me at stitch [at] roll2dice [dot] com.
/Stitch
Monday, 4 August 2008
Humble beginnings
I bought my first Games Workshop game in the beginning of the first half of the 1990's when I was in my early teens. I was in a local toy store and I saw a big box with "Space Marine" written on it in big letters. Turning it over in my hands, I saw that it was full of tiny plastic miniatures in three different colours, cardboard buildings, and more. I was mesmerized. I brought it home and quickly began spreading the tiny space marines, eldar and orks all over the floor.
After reading some of the background material, I immediately fell for the space marines. And since these particular space marines were of a dark green plastic, I decided they would have to be Dark Angels. (The eldar were gray, and the orks were dark blue, by the way.) I still have most, if not all, of those miniatures, actually. Unpainted...
I did try my hand at painting some of the miniatures, but I never got far. And as you can imagine, the ones I did paint looked pretty horrible. :)
I played a few games with my best friend, but we never really got into the finer points of the game. I was hooked on the whole 41st millennium thing, though. A couple of years later, it turned out some other friends of ours were getting into Warhammer 40,000, and we joined in.
I knew right away that I was going to collect space marines, and that they would be Dark Angels. In '95, the toy store closed, and we could no longer buy GW product anywhere in town. In '96, though, I got a flyer in my mailbox saying a local hobby store had begun stocking Warhammer. The rest, as they say, is history.
I'm now in charge of the games department of that same store, and has been for several years. And I'm still in love with the GW hobby, particularly Warhammer 40,000. And I still like the Dark Angels space marines most of all...
Sunday, 3 August 2008
Welcome to the Angel's Talon
Does the world need another Warhammer 40,000 blog? I don't know, but I do know I need to write it. Why? Again, I don't know, but I've just got this feeling that I might enjoy it. And I sincerely hope that you will enjoy reading it.
I love 40k. And I love Space Marines. And, as I will explain in another post, I've always had a soft spot for the Dark Angels.
So, will the Talon be all about Dark Angels? Yep! Occasionally, I may present some other material as well, but if it's not directly related to Dark Angels in 40k, I'll put it in a separate blog. The Angel's Talon is all about the Dark Angels.
What about updates?
Oooh, magic word: Updates
Does the world need another poorly updated 40k site? Certainly not!
The Angel's Talon will be updated on a monthly basis. A lot of the updates will be aimed at beginner players, with some more advanced stuff coming later. Here are some examples of what will be included:
So, will I be able to live up to my own expectations? Come back and see!
I hope you'll enjoy it!
Best regards,
Stitch
I love 40k. And I love Space Marines. And, as I will explain in another post, I've always had a soft spot for the Dark Angels.
So, will the Talon be all about Dark Angels? Yep! Occasionally, I may present some other material as well, but if it's not directly related to Dark Angels in 40k, I'll put it in a separate blog. The Angel's Talon is all about the Dark Angels.
What about updates?
Oooh, magic word: Updates
Does the world need another poorly updated 40k site? Certainly not!
The Angel's Talon will be updated on a monthly basis. A lot of the updates will be aimed at beginner players, with some more advanced stuff coming later. Here are some examples of what will be included:
- Army-building blog
I'm currently building a 1750pt Dark Angels force. I will present my army list and explain my choices. - Modelling
Those Dark Angels will need assembling. Expect some step-by-step tutorials for easy conversions you can try yourself. - Painting
Those miniatures will need some paint as well. I'll show you how I paint my Dark Angels to a decent gaming standard. Again, with step-by-step instructions.
So, will I be able to live up to my own expectations? Come back and see!
I hope you'll enjoy it!
Best regards,
Stitch
Subscribe to:
Posts (Atom)