The next planned update will be on January 1 2009.
I wish you all a Merry Christmas and a Happy New Year!
See you on the other side! :)
Best regards,
Stitch
Monday, 1 December 2008
The Other Talon
I've just started a second 40k blog, The Other Talon. It'll be sort of a sister site to my main blog, the Angel's Talon, to cover everything 40k that is not Dark Angels-related.
It won't be updated regularly, but basically whenever I feel like it. The first post is a mini-review, with pictures, of the new gameboard from GW. It's a fantastic piece of kit!
Please check it out and let me know what you think.
The Other Talon: http://theothertalon.blogspot.com
It won't be updated regularly, but basically whenever I feel like it. The first post is a mini-review, with pictures, of the new gameboard from GW. It's a fantastic piece of kit!
Please check it out and let me know what you think.
The Other Talon: http://theothertalon.blogspot.com
Building my Company Master, part 1: The Bits
As I wrote in another post, I plan on building my own Company Master from the various plastic bits available. Here's a first look at what I'm going to use:
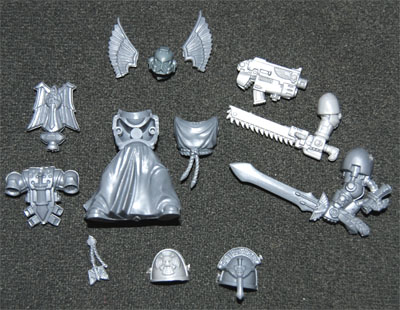 I haven't decided on a right arm yet, I'm still looking at options.
Two left arms? Well, as I'm sure you've noticed already, the bottom one is a terminator arm. I think that power sword looks awesome so I'm going to do a switch on the arm with the chain sword.
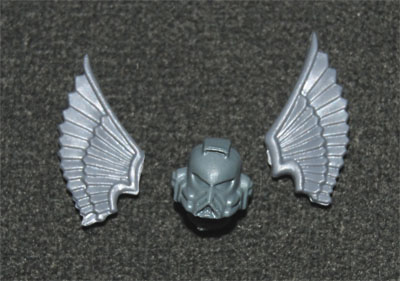
I'm not sure about the head. I think the Maximus pattern helmet (from the Black Templars upgrade sprue) will look great on a Company Master, but I'm not sure how it will look with wings on it.
 We'll have to see if it works. Check out next month's update!
/Stitch
I haven't decided on a right arm yet, I'm still looking at options.Two left arms? Well, as I'm sure you've noticed already, the bottom one is a terminator arm. I think that power sword looks awesome so I'm going to do a switch on the arm with the chain sword.
I'm not sure about the head. I think the Maximus pattern helmet (from the Black Templars upgrade sprue) will look great on a Company Master, but I'm not sure how it will look with wings on it.
We'll have to see if it works. Check out next month's update!/Stitch
Painting Tutorial: Robes
I'm currently painting my second squad of marines, and I thought this would be a good time to do a step-by-step tutorial on how I paint robes. I love the warrior monk theme of the Dark Angels, and I plan to have robes on most, if not all, of my veteran sergeants and other characters.
My usual painting disclaimer: Please note that this tutorial is about painting an army, not winning painting competitions. I'm not even close to a Golden Daemon standard miniatures painter, and neither do I aspire to be one. The important thing for me with my miniatures is that they look good on the table, and that means they only have to look good at arms length.
Dark Angels robes, step by step:
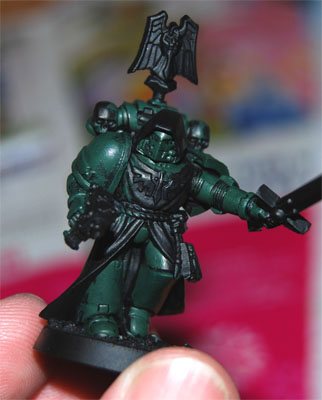
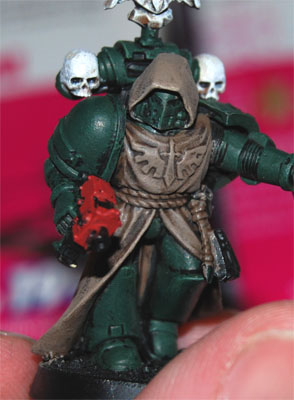
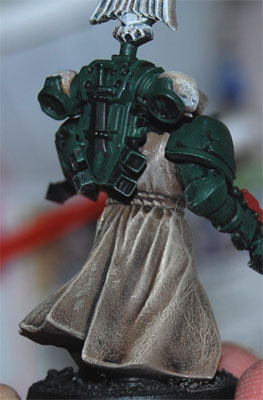
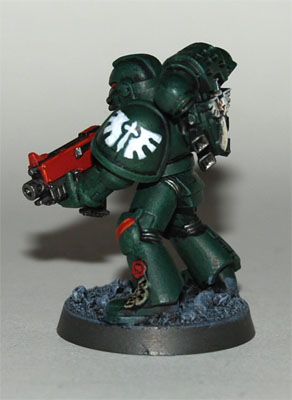
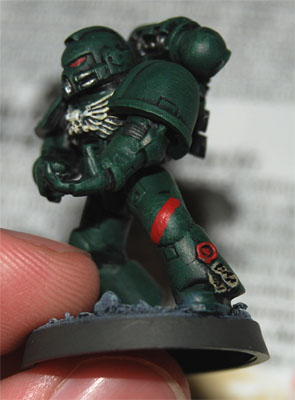
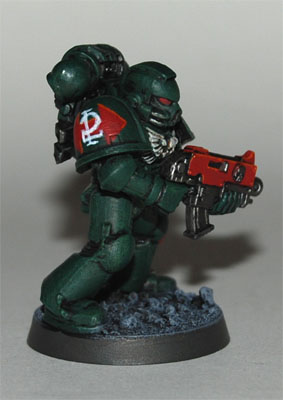
Right, here he is, the Veteran Sergeant of 2nd Tactical Squad, 3rd Company:
The armour, metal bits, markings and bone coloured details will be painted in exactly the same way as in my earlier tutorials, so I won't repeat every step here. You can check them out here:
Here we go...
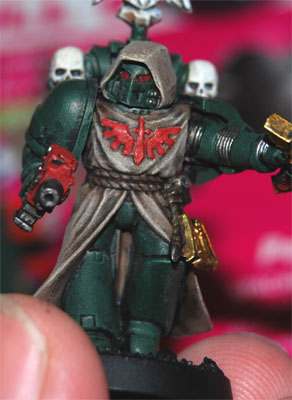
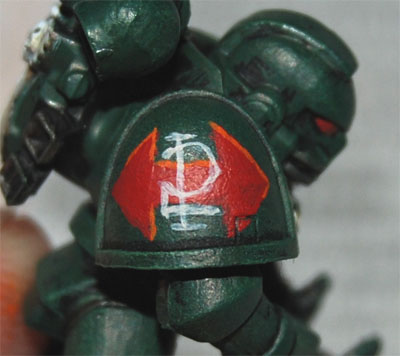
 As you can see, I have just painted over the Dark Angels insignia on his chest. This will be painted red later on, to stand out and add some contrast.

And from the back:
And again, here's a view from the back:
Back:
Almost done...
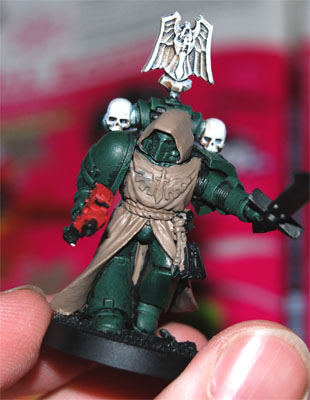
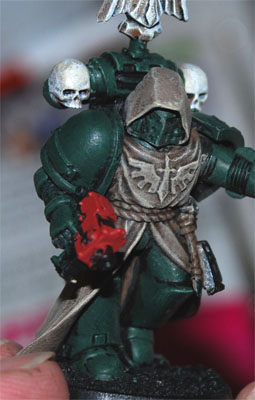
 This last image is from a later stage of the painting process. You'll see more of this guy in next months update...
Of course, there's a million different ways of doing it, but this is how I paint the robes on my Dark Angels. It's quick, it's easy, and it looks good enough, I think. Please tell me what you think by leaving a comment, or emailing me.
/Stitch
My usual painting disclaimer: Please note that this tutorial is about painting an army, not winning painting competitions. I'm not even close to a Golden Daemon standard miniatures painter, and neither do I aspire to be one. The important thing for me with my miniatures is that they look good on the table, and that means they only have to look good at arms length.
Dark Angels robes, step by step:
- Basecoat
- Shade, wash
- First highlight, heavy drybrush
- Final highlight, light drybrush
- Rope: Wash
Right, here he is, the Veteran Sergeant of 2nd Tactical Squad, 3rd Company:
The armour, metal bits, markings and bone coloured details will be painted in exactly the same way as in my earlier tutorials, so I won't repeat every step here. You can check them out here:
- Painting Tutorial: Dark Angel Space Marine
- Painting Tutorial: Dark Angels markings, part 1
- Painting Tutorial: Dark Angels markings, part 2
Here we go...
1. Basecoat
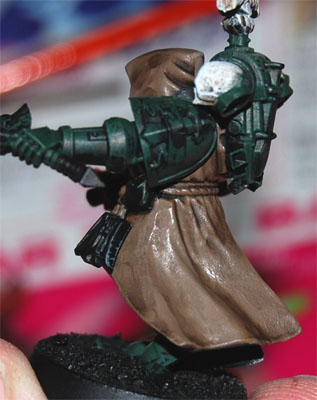
First, paint the robe with Khemri Brown. Even though it is a Foundation Paint, two coats may be needed to get an even coat.As you can see, I have just painted over the Dark Angels insignia on his chest. This will be painted red later on, to stand out and add some contrast.2. Shade
Now splash on a generous wash of Devlan Mud, to provide some basic shading.And from the back:
3. First highlight
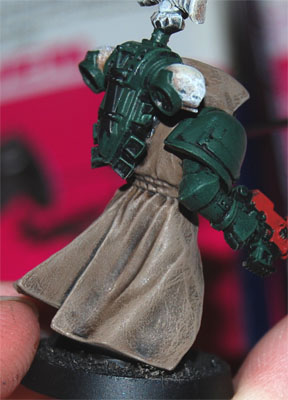
Give the robe a heavy drybrushing of the base colour, Khemri Brown, for the first highlight. Ignore the piece of the robe showing between his legs. It's difficult to reach, and it'll look better shaded anyway.And again, here's a view from the back:
4. Final highlight
For the final highlight, drybrush the robe lightly with Bleached Bone. Pay special attention to the edges. Again, never mind the piece of robe showing between his legs.Back:
Almost done...
5. Rope
Now you just give the rope a wash of Badab Black, and you're done!This last image is from a later stage of the painting process. You'll see more of this guy in next months update...Of course, there's a million different ways of doing it, but this is how I paint the robes on my Dark Angels. It's quick, it's easy, and it looks good enough, I think. Please tell me what you think by leaving a comment, or emailing me.
/Stitch
Friday, 7 November 2008
The Tiger roars about the new Codex: Space Marines
Mr Kilgore, over at The Jungle, has written an excellent review of the new Codex: Space Marines. If you're into Space Marines, head over and give it a read, then tell him what you think over at the Millenium Gate!
Wednesday, 5 November 2008
Assembling the Space Marine Drop Pod
[This article was supposed to be a part of the october update. Unfortunately, my back broke in half (not really, but it felt like it did) and I was unable to sit at my computer for several weeks.]
Assembling our store's pre-release drop pod, I thought of some things that may help others. So, here are some hints for assembling your drop pods.
I hope you found this short article useful. See you next month!
/Stitch
[A very small, very late update, I know. My back is better now, though. That means that I will be able to put together something a bit more substantial for next month.]
Assembling our store's pre-release drop pod, I thought of some things that may help others. So, here are some hints for assembling your drop pods.
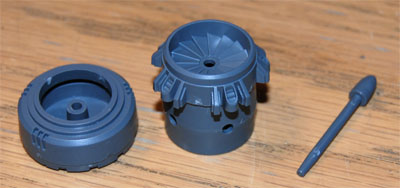
Center turbofan
Only glue the middle parts together. Then stick the pin through the hole and glue it to the bottom bit. This will let you twist the pin on top, to turn the Storm Bolter/Missile Launcher mounted on the bottom bit. Not only is it good clean nerdy fun to be able to turn it to face its target, but it also makes sure the weapon won't be aiming straight into one of the wings.Tricky part
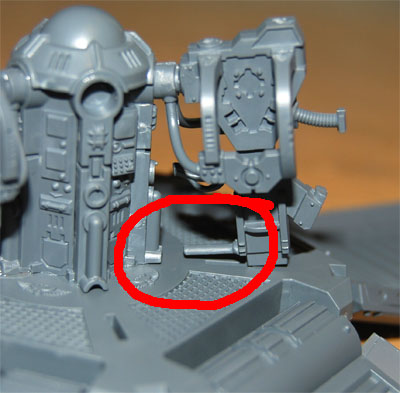
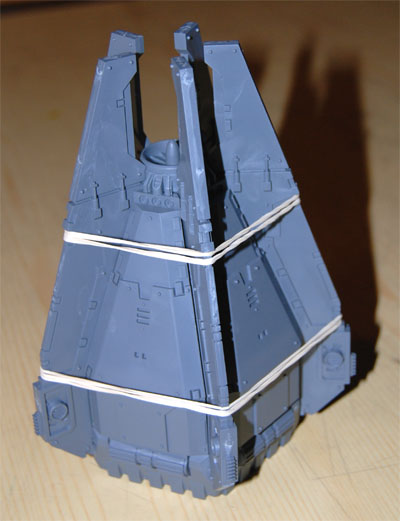
When I glued the restraint blocks in place, I found it easiest to start with the upper part. Then I slotted the block into place, while pushing the small protruding bit on the bottom down to force it into its own hole on the column. The plastic is quite flexible, and this worked like a charm.Rubber bands
When the wings are in place, strap some rubber bands around the whole thing to keep them in the right position while the glue sets.I hope you found this short article useful. See you next month!
/Stitch
[A very small, very late update, I know. My back is better now, though. That means that I will be able to put together something a bit more substantial for next month.]
Wednesday, 1 October 2008
October Update: Delayed
Because of serious problems with my lower back, the october update will unfortunately be delayed, and I'm sorry about that.
When the update is ready and online, I will announce it on the Millenium Gate, in this thread.
See you soon,
Stitch
When the update is ready and online, I will announce it on the Millenium Gate, in this thread.
See you soon,
Stitch
Monday, 1 September 2008
Painting Tutorial: Dark Angels markings, part 2: the Chapter Symbol
Here's how I paint the Dark Angels chapter symbol on my models. I never thought I would be able to pull it off, but when I look at my finished models I think they look pretty damn good.
My usual painting disclaimer: Please note that this tutorial is about painting an army, not winning painting competitions. I'm not even close to a Golden Daemon standard miniatures painter, and neither do I aspire to be one. The important thing for me with my miniatures is that they look good on the table, and that means they only have to look good at arms length.
Dark Angels chapter symbol, step by step:
Now, it's time to turn a green space marine into a Dark Angel!
For steps 1-3 I use thinned down Dheneb Stone, as it gives better coverage than Skull White.
Now, I just mirror the design on the other side for the left wing:

When this is done, I fill in the wings with Dheneb Stone.
After the white paint is completely dry, I clean up the edges a bit with Orkhide Shade.
Two more strokes with Orkhide Shade finishes off the right wing.
Then I just do the same thing with the left wing, and I'm almost done!

Right! The anonymous green space marine from the first two tutorials is now a proper Dark Angel!
As always, thanks for reading.
If you like or dislike this article, please leave a comment and let me know!
You can also e-mail me at stitch [at] roll2dice [dot] com.
/Stitch
My usual painting disclaimer: Please note that this tutorial is about painting an army, not winning painting competitions. I'm not even close to a Golden Daemon standard miniatures painter, and neither do I aspire to be one. The important thing for me with my miniatures is that they look good on the table, and that means they only have to look good at arms length.
Dark Angels chapter symbol, step by step:
- Paint a cross
- Turn the cross into a sword
- Paint the basic shapes of the wings
- Fill in with white and clean up
- Finish the wings
- Clean up
Now, it's time to turn a green space marine into a Dark Angel!
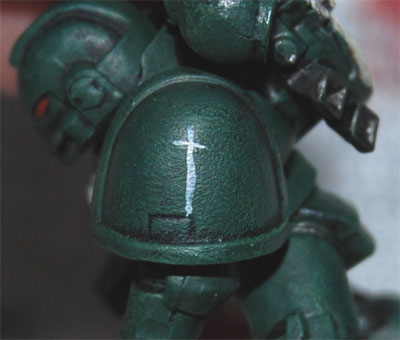
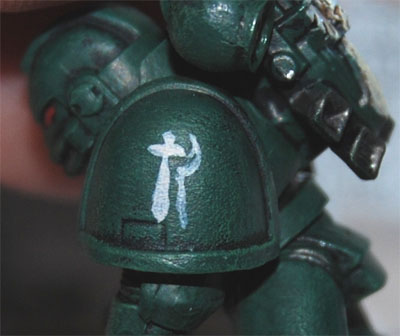
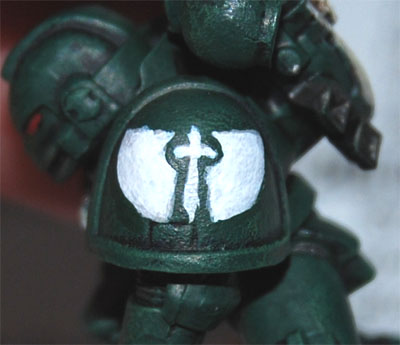
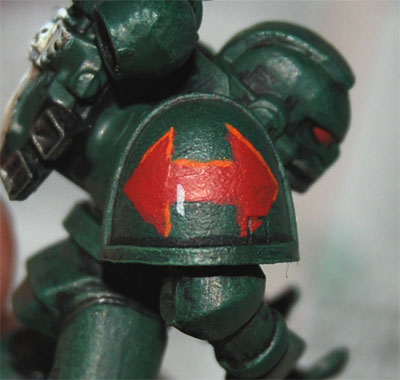
1. Paint a cross
To begin with, I paint a thin cross. This will become the sword. Not completely straight? Never mind! It'll look great when it's finished!For steps 1-3 I use thinned down Dheneb Stone, as it gives better coverage than Skull White.
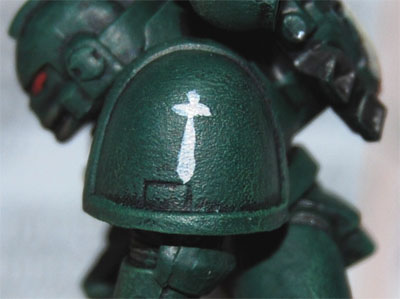
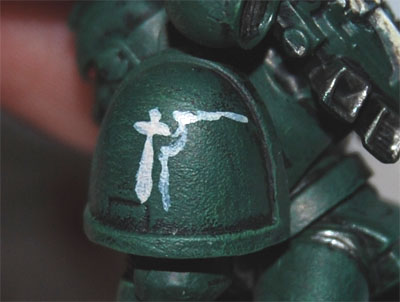
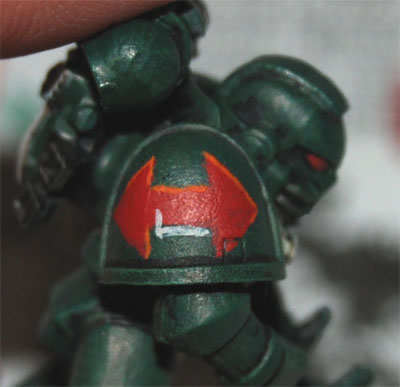
2. Turn the cross into a sword
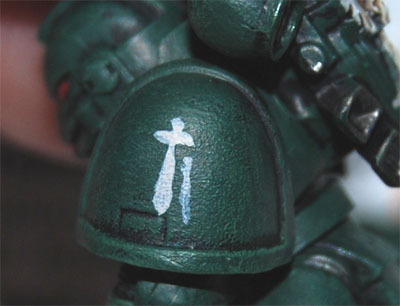
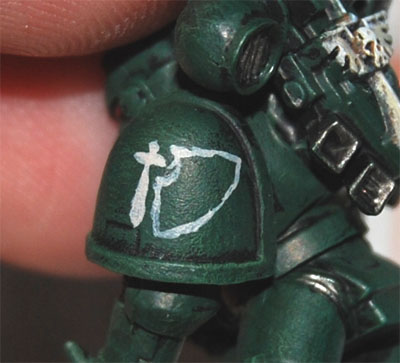
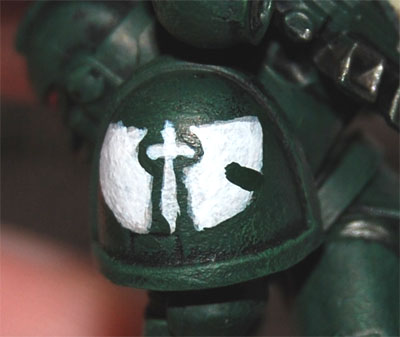
Now I flesh out the cross and turn it into a sword of sorts.3. Paint the basic shapes of the wings
Now I paint the contours of the wings. Here's how I do it, step by step:Now, I just mirror the design on the other side for the left wing:
When this is done, I fill in the wings with Dheneb Stone.
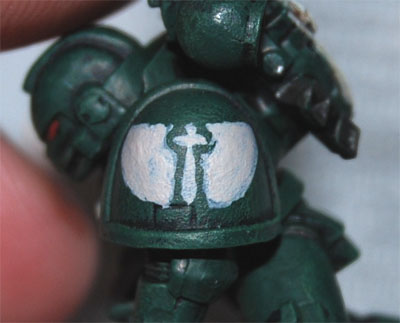
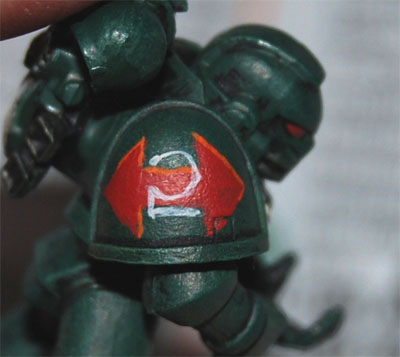
4. Fill in with white and clean up
Now it's time to fill in the entire design with Skull White. Skull White really needs to be thinned down, so I mix in plenty with water and paint several coats. It's important to let each coat dry before applying the next.After the white paint is completely dry, I clean up the edges a bit with Orkhide Shade.
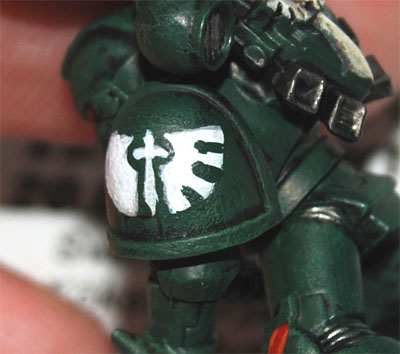
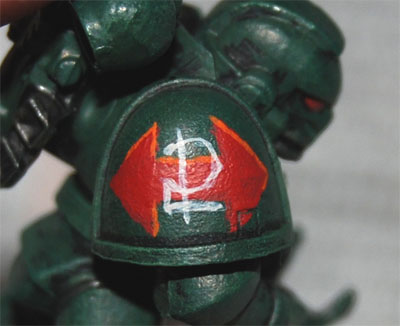
5. Finish the wings
To get the "feathers", I just paint Orkhide Shade over the Skull White, starting in the middle.Two more strokes with Orkhide Shade finishes off the right wing.
Then I just do the same thing with the left wing, and I'm almost done!
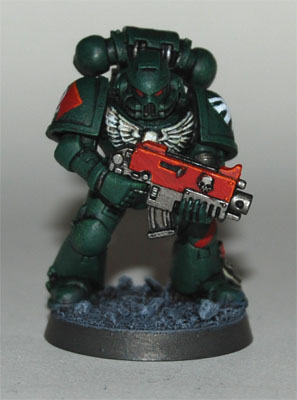
6. Clean up
If I need it, I finish up with some more Skull White and Orkhide Shade to clean up the design. But, as I keep reminding you (and myself!), it doesn't have to be perfect!Right! The anonymous green space marine from the first two tutorials is now a proper Dark Angel!
As always, thanks for reading.
If you like or dislike this article, please leave a comment and let me know!
You can also e-mail me at stitch [at] roll2dice [dot] com.
/Stitch
Painting Tutorial: Dark Angels markings, part 1: Squad Markings
Like I told you last month, I paint all the unit markings and chapter symbols freehand. As promised, here's a step-by-step tutorial explaining how I do it.
Usual painting disclaimer: Please note that this tutorial is about painting an army, not winning painting competitions. I'm not even close to a Golden Daemon standard miniatures painter, and neither do I aspire to be one. The important thing for me with my miniatures is that they look good on the table, and that means they only have to look good at arms length.
Up close and personal my Dark Angels look a little messy. No two chapter symbols or numbers are exactly the same, for instance. But I believe that that's the secret to painting an army. I had to struggle in the beginning, because, like a lot of people, I would like my army to be perfect. But I also want it done this millennium, preferably within a year or so. So I had to let go of the dream of a perfect army, in favor of the much more reasonable goal of a completed army that looks good on the table.
Dark Angels 3rd Company and Tactical Squad markings, step by step:
As usual, a note on brushes and paints. Unless otherwise noted, all paints and brushes used in this tutorial are from Citadel/Games Workshop. You are, of course, free to use whatever painting supplies you like, but it's worth mentioning for the purpose of brush size, for instance.
Now, let's get painting!
I also thin my paint a bit, just to maintain a little better control over the point of the brush.
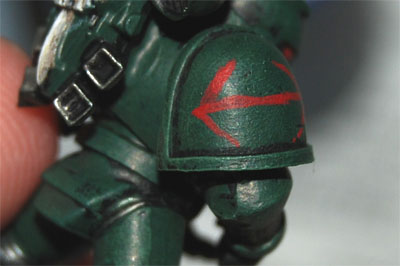
For the tactical double arrows, I start with a simple line in Mechrite Red:
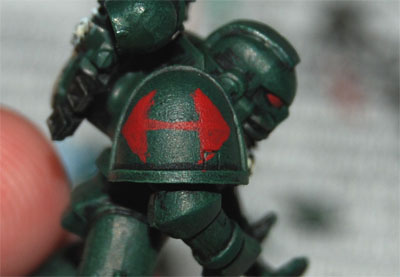
Then I paint the basic arrows.
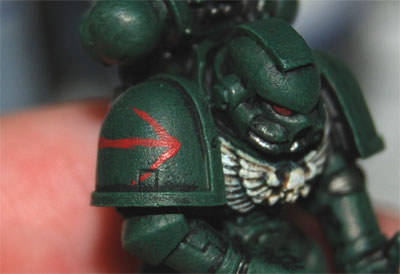
Then I flesh out the arrows.
After that, I just flesh out the original line. (Not pictured.)
Left knee:
And the right shoulder:
As I'm currently painting the 2nd squad from 3rd Company, the numeral in this tutorial will be a 2. Other numerals may be the subjects for other tutorials in the future.
Again, to paint this complex numeral, I divide it into simpler shapes and just paint it a step at a time.
I start with Dheneb Stone, as it covers better than Skull White.
Here's the numeral, step by step:
Then I flesh the numeral out a bit with Skull White, adding any small detail that I may have forgotten. (Such as the small uppy-pointy-bit to the right.)

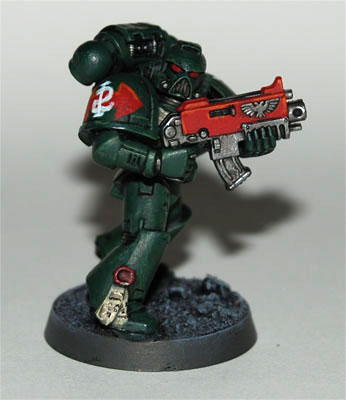
Here's the marine, with tactical badge and squad number:
Thanks for reading. Please check out Part 2, for a tutorial on painting the Dark Angels chapter symbol!
If you like or dislike this article, please leave a comment and let me know!
You can also e-mail me at stitch [at] roll2dice [dot] com.
/Stitch
Usual painting disclaimer: Please note that this tutorial is about painting an army, not winning painting competitions. I'm not even close to a Golden Daemon standard miniatures painter, and neither do I aspire to be one. The important thing for me with my miniatures is that they look good on the table, and that means they only have to look good at arms length.
Up close and personal my Dark Angels look a little messy. No two chapter symbols or numbers are exactly the same, for instance. But I believe that that's the secret to painting an army. I had to struggle in the beginning, because, like a lot of people, I would like my army to be perfect. But I also want it done this millennium, preferably within a year or so. So I had to let go of the dream of a perfect army, in favor of the much more reasonable goal of a completed army that looks good on the table.
Dark Angels 3rd Company and Tactical Squad markings, step by step:
- 3rd Co badge, left knee
- Tactical symbol, right shoulder pad
- Highlighting
- Clean up
- Squad number, right shoulder pad
- Clean up
As usual, a note on brushes and paints. Unless otherwise noted, all paints and brushes used in this tutorial are from Citadel/Games Workshop. You are, of course, free to use whatever painting supplies you like, but it's worth mentioning for the purpose of brush size, for instance.
Now, let's get painting!
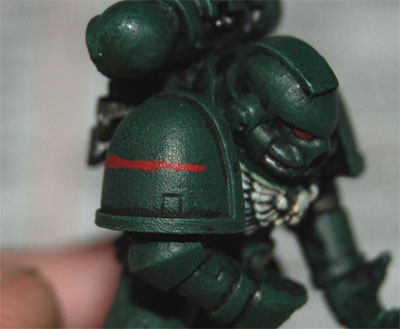
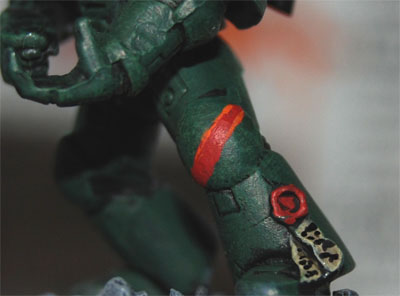
1. 3rd Co badge, left knee
The 3rd company badge couldn't be easier. I just paint a line of Mechrite Red diagonally across the left knee. On marines with mk 6 legs, without knee pads, I paint the line across the entire lower leg. I think it adds to the variation, but in a way that still ties the miniatures together.2. Tactical symbol, right shoulder pad
The secret to painting these kinds of symbols, at least for me, is to divide them into separate, simpler shapes.I also thin my paint a bit, just to maintain a little better control over the point of the brush.
For the tactical double arrows, I start with a simple line in Mechrite Red:
Then I paint the basic arrows.
Then I flesh out the arrows.
After that, I just flesh out the original line. (Not pictured.)
3. Highlighting
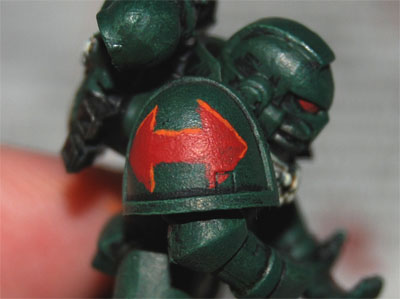
I like to paint some Macharius Solar Orange along some of the edges, just to make the symbols pop out a bit. I deliberately pick out the edges that would be highlighted if the light source was up and to the right. It's not necessarily correct, but it makes the badges stand out more than with just the red, and that makes them more visible on the table.Left knee:
And the right shoulder:
4. Clean up
If I've managed to get any paint where it doesn't belong, this is where I clean it up with more Mechrite Red and Orkhide Shade. But remember, it doesn't have to be perfect. No one will notice small mistakes on the gaming table!5. Squad number, right shoulder pad
Now, this is the tricky part. I thin my paint at every step, as it's almost impossible to paint thin lines with paint straight from the pot.As I'm currently painting the 2nd squad from 3rd Company, the numeral in this tutorial will be a 2. Other numerals may be the subjects for other tutorials in the future.
Again, to paint this complex numeral, I divide it into simpler shapes and just paint it a step at a time.
I start with Dheneb Stone, as it covers better than Skull White.
Here's the numeral, step by step:
Then I flesh the numeral out a bit with Skull White, adding any small detail that I may have forgotten. (Such as the small uppy-pointy-bit to the right.)
6. Clean up
Again, this is where I correct any big mistakes by painting over them with Orkhide Shade and Mechrite Red.Here's the marine, with tactical badge and squad number:
Thanks for reading. Please check out Part 2, for a tutorial on painting the Dark Angels chapter symbol!
If you like or dislike this article, please leave a comment and let me know!
You can also e-mail me at stitch [at] roll2dice [dot] com.
/Stitch
Army-building: The List
As I said in my first post, I'm currently building a 1750 points Dark Angels army. I thought I'd present my army list here, both so I can talk a little about my choices, but also so you can see what's coming in future updates.
I'll show you the list first, and then talk about each part, but I won't bore you with details right now. If anyone is interested in seeing the actual points value of each choice, I'll be happy to show them in a later update.
HQ:
I decided on a Company Master with a Command Squad as HQ. The Chaplains and Librarian are all cool character choices, and awesome models, but I want to use some of the cool Dark Angels upgrade bits to build my own plastic Master.
The Command Squad will include an Apothecary, Standard Bearer and a Company Champion. With a total of four power weapons and two flamers, I'm hoping this unit will be able to dish out some serious hurt and clear objectives for my Tactical Squads to hold. The Razorback will hopefully get them to where they need to be, without them being shot to pieces on the way.
TROOPS 1, 2 & 3:
I think Tactical Squads should always be the core of a Space Marine army, and with 5th Edition, you really need them. The option to split them into five-man combat squads makes them extremely versatile, and gives me a potential six Troops units with which to hold objectives.

I'm hoping to paint up the entire 3rd Company, eventually, and three full Tactical Squads with Rhinos will not only be a solid core for the force, but will also provide a good start for the bigger project.

The Tactical Squads will have a Plasma Cannon, Missile Launcher and Lascannon, respectively. The special weapons slots will be filled with two Plasma guns and a Meltagun. However, the special weapons are not glued, but are held in place by magnets. This way, I can swap them around. I will paint up a whole bunch of Flamers, Meltaguns and Plasma guns with magnets, so I'll always have options when I build my lists in the future. This will be the topic of a future tutorial, if anyone is interested.
ELITE:
I don't think I could ever play a 1000+ points game without at least one Dreadnought, as it is one of my absolute favourite models. I've got both a right and a left arm Twin-linked Autocannon, so in some games I'll be able to field him as a Mortis Dread. For this list, though, the left arm will be a close combat weapon with a heavy flamer.
The Dreadnought will be held together with magnets at three points: both arms and the waist. This will allow me to take it apart for easy storage and transport, as well as allowing me to change the armament between games.
FAST ATTACK:
Land Speeders are fragile on the table, but they look really cool and they can fill the air with screaming bullets before they go down. I will have one regular speeder and one Typhoon variant. I would like to have an Assault Cannon as well, but I don't have the points for it.
If they survive long enough, they may even be able to deny the enemy an objective by flying in on top of it in the last turn.
HEAVY SUPPORT 1 & 2:
A Predator with Twin-linked Lascannon and two Heavy Bolters should work well against both enemy armour and infantry. And a Vindicator can make anyone worry about where they move their units to.
I thought about taking a Devastator Squad, to tie in with the Battle Company plans, but I already have a Predator that just needs a new paint job, and the new Vindicator model is just too damn sweet to leave out.
That's it! That's 1750 points of angels of death in green armour.
Comments and e-mails are always welcome, so if there's anything you'd like to say to me, don't hold back!
I'll show you the list first, and then talk about each part, but I won't bore you with details right now. If anyone is interested in seeing the actual points value of each choice, I'll be happy to show them in a later update.
- HQ:
Company Master, Command Squad (5), Razorback - TROOPS 1:
Tactical Squad (10), Rhino - TROOPS 2:
Tactical Squad (10), Rhino - TROOPS 3:
Tactical Squad (10), Rhino - ELITE:
Dreadnought - FAST ATTACK:
Ravenwing Support Squadron (2) - HEAVY SUPPORT 1:
Predator - HEAVY SUPPORT 2:
Vindicator
HQ:
I decided on a Company Master with a Command Squad as HQ. The Chaplains and Librarian are all cool character choices, and awesome models, but I want to use some of the cool Dark Angels upgrade bits to build my own plastic Master.
The Command Squad will include an Apothecary, Standard Bearer and a Company Champion. With a total of four power weapons and two flamers, I'm hoping this unit will be able to dish out some serious hurt and clear objectives for my Tactical Squads to hold. The Razorback will hopefully get them to where they need to be, without them being shot to pieces on the way.
TROOPS 1, 2 & 3:
I think Tactical Squads should always be the core of a Space Marine army, and with 5th Edition, you really need them. The option to split them into five-man combat squads makes them extremely versatile, and gives me a potential six Troops units with which to hold objectives.

I'm hoping to paint up the entire 3rd Company, eventually, and three full Tactical Squads with Rhinos will not only be a solid core for the force, but will also provide a good start for the bigger project.

The Tactical Squads will have a Plasma Cannon, Missile Launcher and Lascannon, respectively. The special weapons slots will be filled with two Plasma guns and a Meltagun. However, the special weapons are not glued, but are held in place by magnets. This way, I can swap them around. I will paint up a whole bunch of Flamers, Meltaguns and Plasma guns with magnets, so I'll always have options when I build my lists in the future. This will be the topic of a future tutorial, if anyone is interested.
ELITE:
I don't think I could ever play a 1000+ points game without at least one Dreadnought, as it is one of my absolute favourite models. I've got both a right and a left arm Twin-linked Autocannon, so in some games I'll be able to field him as a Mortis Dread. For this list, though, the left arm will be a close combat weapon with a heavy flamer.
The Dreadnought will be held together with magnets at three points: both arms and the waist. This will allow me to take it apart for easy storage and transport, as well as allowing me to change the armament between games.
FAST ATTACK:
Land Speeders are fragile on the table, but they look really cool and they can fill the air with screaming bullets before they go down. I will have one regular speeder and one Typhoon variant. I would like to have an Assault Cannon as well, but I don't have the points for it.
If they survive long enough, they may even be able to deny the enemy an objective by flying in on top of it in the last turn.
HEAVY SUPPORT 1 & 2:
A Predator with Twin-linked Lascannon and two Heavy Bolters should work well against both enemy armour and infantry. And a Vindicator can make anyone worry about where they move their units to.
I thought about taking a Devastator Squad, to tie in with the Battle Company plans, but I already have a Predator that just needs a new paint job, and the new Vindicator model is just too damn sweet to leave out.
That's it! That's 1750 points of angels of death in green armour.
Comments and e-mails are always welcome, so if there's anything you'd like to say to me, don't hold back!
Tuesday, 5 August 2008
Next update: September 1st
The next update will be posted on monday, 1 september.
It will include a step by step tutorial explaining how I paint the Dark Angels chapter symbol and squad / company markings on my miniatures.
See you then!
/Stitch
In the mean time, please leave a comment, or e-mail me at stitch [at] roll2dice [dot] com.
It will include a step by step tutorial explaining how I paint the Dark Angels chapter symbol and squad / company markings on my miniatures.
See you then!
/Stitch
In the mean time, please leave a comment, or e-mail me at stitch [at] roll2dice [dot] com.
Tip: Lean the paint pots, avoid messy spills
To avoid messy spills, when I open a pot to lock the lid in place, I tip it forward to make the paint drop into the pot, instead of outside the rim of the pot. This is especially common with the new paint pots from Games Workshop, such as the Foundation Paints, when you open them all the way.
Similarly, I always lean the open paint pot on a brush when I'm painting, to keep the paint inside the pot.

Similarly, I always lean the open paint pot on a brush when I'm painting, to keep the paint inside the pot.
Painting Tutorial: Dark Angel Space Marine
[7 Aug: I found out the pictures were much too dark on CRT monitors, and some people (including me, on another computer!) couldn't see the difference between the black and the green... Ooops... :) Anyway! Now I've tweaked the brightness and contrast and uploaded new pictures, so hopefully they will make a little more sense for those of you with darker displays. Please let me know if you still have problems with the pictures!
Because of my love for the Dark Angels, I've always used their Codex. But I haven't painted my marines as Dark Angels. Instead, I've made up a few Successor Chapters during the years. Why? The paints! Both Dark Angels Green and Blood Red gives lousy coverage on a black undercoat, and I just couldn't be bothered with thinning the paint and painting 17 layers on each miniature.
Even so, with my own colour schemes, I've never finished an army. I've always tweaked the color scheme, or changed the chapter symbol, etc, etc... Now though, I've finally decided to paint actual Dark Angels, thanks to the Foundation Paints.
The Foundation Paints are awesome, and the two main colours I use are Orkhide Shade and Mechrite Red. Orkhide Shade covers black in one coat. Mechrite Red doesn't cover as good, but it still only needs two coats.
I won't go into detail on different techniques, as it is beyond the scope of this tutorial. If you do not already know what Drybrushing is, for example, I sincerely recommend the book How to Paint Citadel Miniatures from Games Workshop. It explains all these techniques better than I ever could.
Please note that this tutorial is about painting an army, not winning painting competitions. I'm not even close to a Golden Daemon standard miniatures painter, and neither do I aspire to be one. The important thing for me with my miniatures is that they look good on the table, and that means they only have to look good at arms length.
So, here is how I paint my Dark Angels, step by step:
Just a note on brushes and paints. Unless otherwise noted, all paints and brushes used in this tutorial are from Citadel/Games Workshop. You are, of course, free to use whatever painting supplies you like, but it's worth mentioning for the purpose of brush size, for instance.
Now, let's get down to business!

I won't go into more detail, but I'll just mention that I always glue any basing material (sand, grit, etc) to the base before undercoating. The spray paint will help hold the material in place, so it doesn't come off during painting. After finishing the undercoat with some Chaos Back paint and a Standard brush from GW, filling in the areas missed by the spray, it's time for the base coat. Read on.
Don't worry if you cover some of the detail up. When the marine is on the table with his brothers, no one will notice!

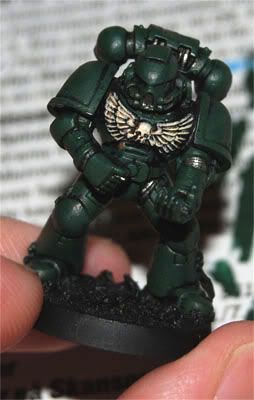
When finished, the marine should look something like this:
When the Bolter is not attached to the arm (such as with some of the Dark Angels Upgrade bits), I usually don't glue it in place until after painting. This makes it easier to paint the chest of the marine. Remember to use a water based glue when you glue the Bolter in place, as plastic glue (poly cement) can dissolve and smear the paint, and super glue can leave ugly traces if you get it in the wrong place.
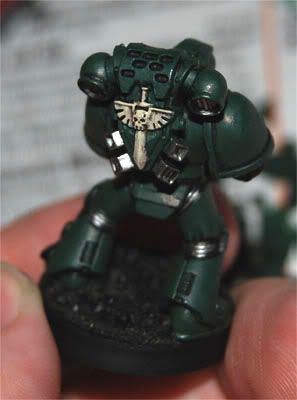
Back:
Front:
Overbrushing is great for the Bolter as well, leaving some black showing for the deeper shading:
Don't worry if you get some Boltgun Metal in the wrong place. We will take care of that in Step 8: Touch-up.
Back:
Now, drybrush the same details with Bleached Bone. A few thinner coats is better than a thick one. You want some of the brown and black to show through:
And the back again:
After Step 8, this is what we've got so far:
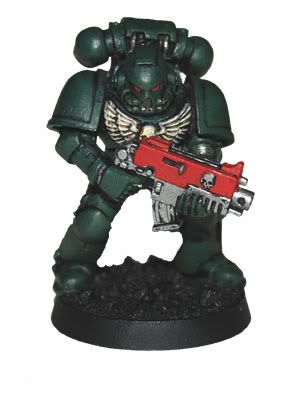
Not bad, if I say so myself. In fact, if you're happy with this, just skip the rest of the steps. Together with an army painted in the same way, this guy would look good on a table as he is.
I'm not entirely satisfied, though.
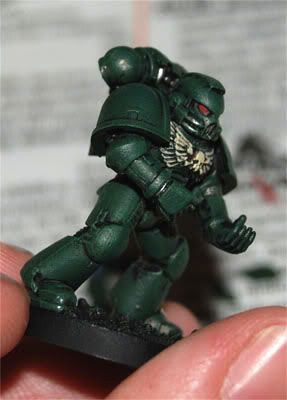
Now, when I say lightly, I mean it. I just want a hint of a lighter green on the edges of the armour. And, when I say almost the entire model, I mean you need to take care not to discolour the chest eagle and other non-green details.
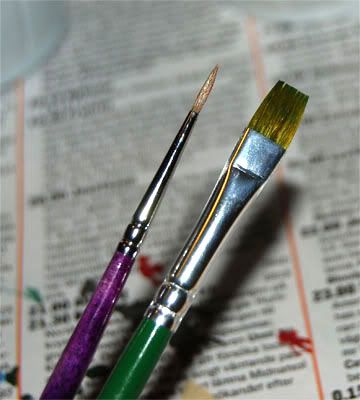
The brush I use for this step is a cheap, but decent quality, brush with synthetic bristles. (The brush on the left is a Standard brush, shown for size comparison.)
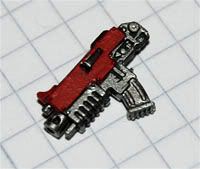
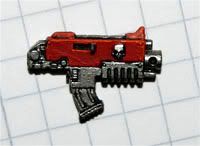
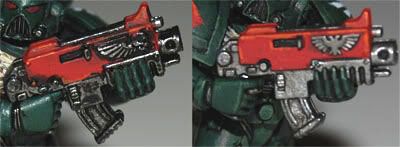
I highlight the red areas, such as the Bolter casing, with Macharius Solar Orange. To do this, I thin the paint just a bit and carefully brush it along the edges of the areas to be highlighted. I also apply some Macharius Solar Orange on the raised rivets to make them pop out just a bit.
I carefully drybrush the chest eagle and other bone details with Skull White. Not all over, just a bit to give it a little extra highlight.
After the metal bits, the entire purity seal gets the same treatment. Feel free to leave a little pool of Badab Black in the middle of the wax seal, to give it some extra depth.
Almost done!
I start with overbrushing the top of the base with Charadon Granite.
I then apply a heavy drybrushing of Adeptus Battlegrey, followed by a lighter drybrushing with Codex Grey, and finally a light drybrushing with Fortress Grey.
If, during any of these stages, I get any grey paint on the marine's feet, I just let it be, unless I really make a mess. After all, he's walking around in it, it's only reasonable that some of it is going to stick to his boots.
After this, all that is left is the edge. Using a Standard brush, I apply a generous coat of Charadon Granite all along the edge, taking care to leave the drybrushed top edge.
That's it!

Thanks for reading. Please join me next month for a step by step tutorial on how I paint the Chapter symbol and squad markings!
If you like or dislike this article, please leave a comment and let me know!
You can also e-mail me at stitch [at] roll2dice [dot] com.
/Stitch
Because of my love for the Dark Angels, I've always used their Codex. But I haven't painted my marines as Dark Angels. Instead, I've made up a few Successor Chapters during the years. Why? The paints! Both Dark Angels Green and Blood Red gives lousy coverage on a black undercoat, and I just couldn't be bothered with thinning the paint and painting 17 layers on each miniature.
Even so, with my own colour schemes, I've never finished an army. I've always tweaked the color scheme, or changed the chapter symbol, etc, etc... Now though, I've finally decided to paint actual Dark Angels, thanks to the Foundation Paints.
The Foundation Paints are awesome, and the two main colours I use are Orkhide Shade and Mechrite Red. Orkhide Shade covers black in one coat. Mechrite Red doesn't cover as good, but it still only needs two coats.
I won't go into detail on different techniques, as it is beyond the scope of this tutorial. If you do not already know what Drybrushing is, for example, I sincerely recommend the book How to Paint Citadel Miniatures from Games Workshop. It explains all these techniques better than I ever could.
Please note that this tutorial is about painting an army, not winning painting competitions. I'm not even close to a Golden Daemon standard miniatures painter, and neither do I aspire to be one. The important thing for me with my miniatures is that they look good on the table, and that means they only have to look good at arms length.
So, here is how I paint my Dark Angels, step by step:
- Undercoat
- Base coat
- Bolter casing
- Metal bits
- Chest eagle + skulls
- Purity seals
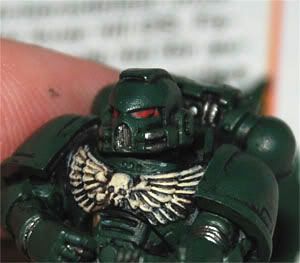
- Eye-lenses
- Touch-up
- Highlighting
- Shading metal bits + purity seals
- Finishing touches on purity seals
- The base
Just a note on brushes and paints. Unless otherwise noted, all paints and brushes used in this tutorial are from Citadel/Games Workshop. You are, of course, free to use whatever painting supplies you like, but it's worth mentioning for the purpose of brush size, for instance.
Now, let's get down to business!
1. Undercoat
I use a black undercoat for my Dark Angels. As you will see later on, this creates almost all the shading I need. Nowadays I almost exclusively use Matt Black Primer from The Army Painter, but Games Workshop's Chaos Black will work just as well.I won't go into more detail, but I'll just mention that I always glue any basing material (sand, grit, etc) to the base before undercoating. The spray paint will help hold the material in place, so it doesn't come off during painting. After finishing the undercoat with some Chaos Back paint and a Standard brush from GW, filling in the areas missed by the spray, it's time for the base coat. Read on.
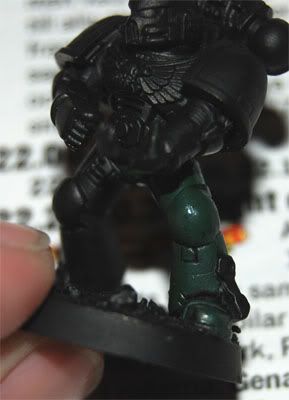
2. Base coat
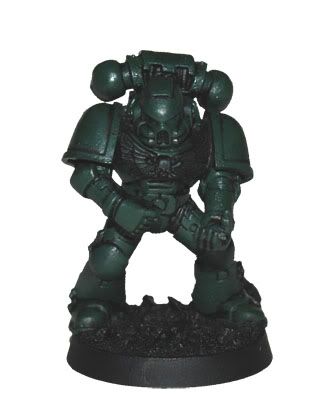
Overbrushing is basically the same as drybrushing, but with more paint in the brush. By using this technique, you can still see the black in the recesses of the armour. The base coat is all Orkhide Shade, straight from the pot. I seldom thin my paints, and I almost never mix paints. For this step, I use a Standard brush.Don't worry if you cover some of the detail up. When the marine is on the table with his brothers, no one will notice!
When finished, the marine should look something like this:
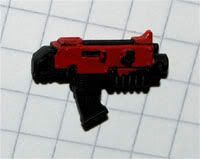
3. Bolter casing
For this step, I use a Detail brush. I paint the casing of the bolter with Mechrite Red. Two coats will do nicely. Take care to let the black show in the recesses. But, again, if you cover some of the detail, don't worry about it.When the Bolter is not attached to the arm (such as with some of the Dark Angels Upgrade bits), I usually don't glue it in place until after painting. This makes it easier to paint the chest of the marine. Remember to use a water based glue when you glue the Bolter in place, as plastic glue (poly cement) can dissolve and smear the paint, and super glue can leave ugly traces if you get it in the wrong place.
4. Metal bits
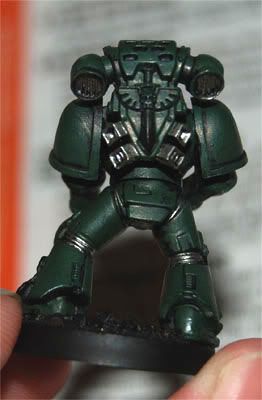
Using a Detail brush, I paint all metal areas with Boltgun Metal. This means most of the joints of the armour, plus exhausts on the backpack, etc.Back:
Front:
Overbrushing is great for the Bolter as well, leaving some black showing for the deeper shading:
Don't worry if you get some Boltgun Metal in the wrong place. We will take care of that in Step 8: Touch-up.
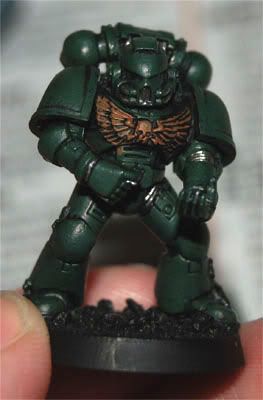
5. Chest eagle + skulls
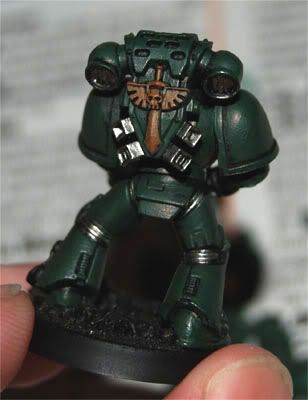
Overbrush the chest eagle and any skulls, etc, with Calthan Brown, again leaving some black showing.Back:
Now, drybrush the same details with Bleached Bone. A few thinner coats is better than a thick one. You want some of the brown and black to show through:
And the back again:
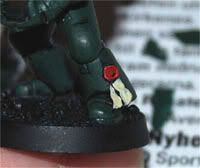
6. Purity seals
Paint the wax Mechrite Red. It's ok to leave some black showing along the inner edge. Paint the parchment Bleached Bone. You may need to apply two or even three coats.7. Eye lenses
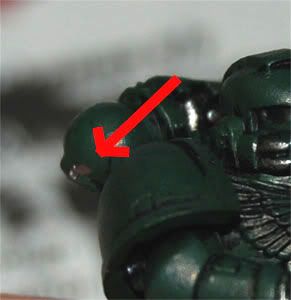
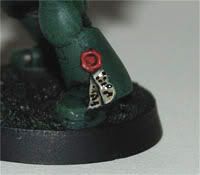
The eye-lenses get a thin coat of Mechrite Red with a Fine Detail brush. Take care to leave some black around the edges. This is usually one of the few steps where I thin the paint slightly, taking care to only use the very tip of the brush.8. Touch-up
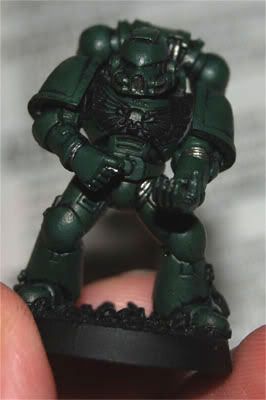
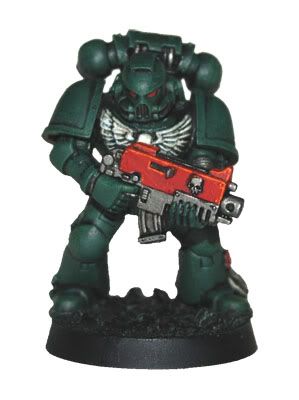
This is where I fix the base coat by covering up all the little mistakes I've made along the way, such as the backpack shown under Step 4: Metal, and the eye shown just above this paragraph.After Step 8, this is what we've got so far:
Not bad, if I say so myself. In fact, if you're happy with this, just skip the rest of the steps. Together with an army painted in the same way, this guy would look good on a table as he is.
I'm not entirely satisfied, though.
9. Highlighting
Using a large brush, I now lightly drybrush almost the entire model with Gnarloc Green.Now, when I say lightly, I mean it. I just want a hint of a lighter green on the edges of the armour. And, when I say almost the entire model, I mean you need to take care not to discolour the chest eagle and other non-green details.
The brush I use for this step is a cheap, but decent quality, brush with synthetic bristles. (The brush on the left is a Standard brush, shown for size comparison.)
I highlight the red areas, such as the Bolter casing, with Macharius Solar Orange. To do this, I thin the paint just a bit and carefully brush it along the edges of the areas to be highlighted. I also apply some Macharius Solar Orange on the raised rivets to make them pop out just a bit.
I carefully drybrush the chest eagle and other bone details with Skull White. Not all over, just a bit to give it a little extra highlight.
10. Shading metal bits + purity seals
In this step, all metal bits get a coat of Badab Black wash. I really like the new Citadel washes. You can see why in the picture below. That's the old Black Ink on the left Bolter, and Badab Black on the right.After the metal bits, the entire purity seal gets the same treatment. Feel free to leave a little pool of Badab Black in the middle of the wax seal, to give it some extra depth.
11. Finishing touches on purity seals
After I am sure that the Badab Black wash is completely dry, I highlight the wax with some more Mechrite Red along the edge and in the middle. I then scribble some wavy lines and dots on the parchment with a black fineliner pen.Almost done!
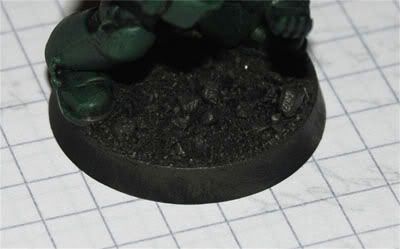
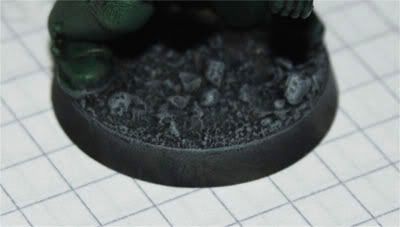
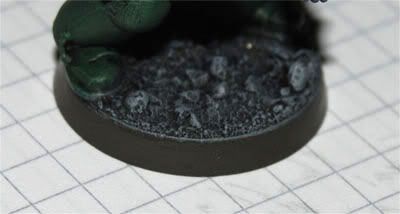
12. The base
Unfortunately, due to the blue light of the camera flash, the pictures of this step didn't come out so well, but I'm sure you get the idea.I start with overbrushing the top of the base with Charadon Granite.
I then apply a heavy drybrushing of Adeptus Battlegrey, followed by a lighter drybrushing with Codex Grey, and finally a light drybrushing with Fortress Grey.
If, during any of these stages, I get any grey paint on the marine's feet, I just let it be, unless I really make a mess. After all, he's walking around in it, it's only reasonable that some of it is going to stick to his boots.
After this, all that is left is the edge. Using a Standard brush, I apply a generous coat of Charadon Granite all along the edge, taking care to leave the drybrushed top edge.
That's it!
Thanks for reading. Please join me next month for a step by step tutorial on how I paint the Chapter symbol and squad markings!
If you like or dislike this article, please leave a comment and let me know!
You can also e-mail me at stitch [at] roll2dice [dot] com.
/Stitch
Subscribe to:
Posts (Atom)