Wow... March just kinda sailed past me and I completely missed it... :)
Well, I'm almost back on track now. The april update will be split into several parts, though, until I catch up. The first update is already online here:Part 2 is coming up in a couple of days.
Now, comments. I love em! Here we go:
AaronB said:
>>> I just finished 1500pts of my Skull Bashers. I made a little back story where they try to follow the Legion of the Damned around. Their Chappie is able to "summon" them.
Here's where I am so far:
http://www.flickr.com/photos/8424618@N02/sets/72157614067871510/
Great stuff! You've got a really nice looking army there! I particularly like the Terminator Chaplain, it looks awesome!
>>> *shakes fist* Com'n already! :D
Yeah, sorry about that... :) Well, like I said above, I'm basically back on track now.
The 25mm Warrior said:
>>> I really, really dig the wings on the helmet. An all around great and solid conversion... nice!
Thanks! Yeah, I'm kinda getting used to it, and I really like it. By the way, I checked out your blog. It looks like you've got a pretty solid Blood Angels army there, it looks good. Quick Shade is a great product. I've met Bo on several occasions, and he is a fantastic guy!
Thanks for commenting, guys! Please keep reading, and please keep commenting.
Best regards,
Stitch
Thursday, 2 April 2009
Terminator Weapon Swaps made Easy with Magnets, Part 1
Hi all!
Sorry for skipping a month. I didn't plan it like that, but stuff and things, and stuff, got in the way. :)
For april, though, I'm back with an in-depth article about how to let you swap weapons on your Space Marine Terminators. The new plastics are awesome, and you get a lot of options in the box. Why not make sure you can use all of them? (Or most of them, anyway...)
For this project (I'll tell you more about it later), I won't need to be able to swap both arms on every Terminator. So, I'll glue some of the arms, but magnetize some. For instance, I'll have two Terminators with Storm Bolters and the option to swap between Power Fists and Chain Fists. And of course I'll have one Terminator with Power Fist, but with the option of swapping between Storm Bolter, Heavy Flamer and Assault Cannon.
Let's get to it!
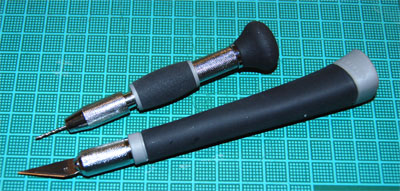 Hobby drill and knife.
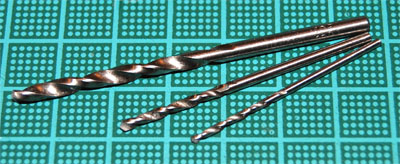 Drill bits; these are 1.5mm, 2mm and 3.2mm.
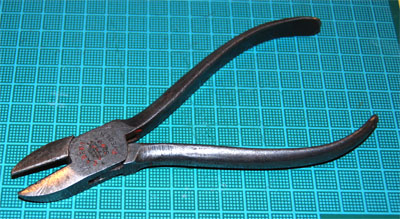 You need a proper wire cutter. A small cutter like you use to cut bits from sprues just won't "cut it"... :)
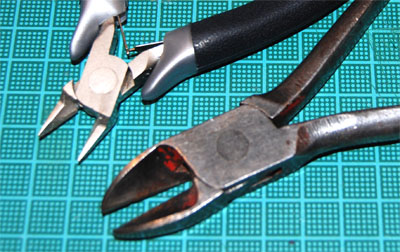 Notice the difference? Later on in the tutorial, we'll be cutting nails. (Not finger or toe nails!) The smaller cutter would be ruined, and you risk hurting yourself when bits of it breaks off and flies towards your face at high velocity.
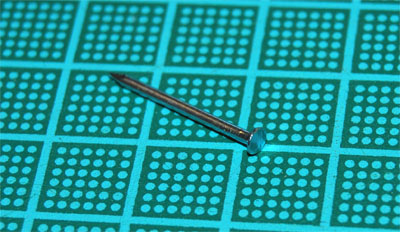 Flat headed nails in a couple of different sizes.
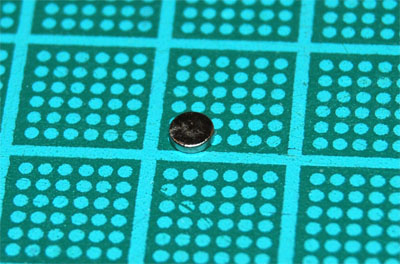 This is a Neodymium disc magnet from K&J Magnetics. It's tiny but strong! This one is 1/8" x 1/32", and will be used for the arms.
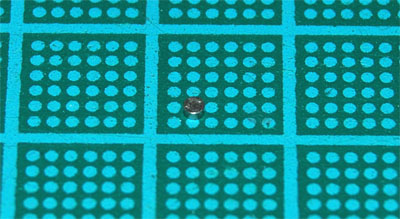 This one is even smaller! Also from K&J Magnetics. This one is 1/16" x 1/32", and will be used to hold the shoulder pads in place.
Right, unfortunately it's now past my bed time, and I will have to continue another day. Part 2 of this tutorial, where we actually magnetize the Terminators, will be online in a couple of days. No really, I promise!
I know it sucks that I couldn't finish it in time, but I thought it better to give you half a tutorial now, and show you that I still mean business, than waiting even longer before publishing anything at all.
See you soon!
/Stitch
Here's a taste of what's to come:
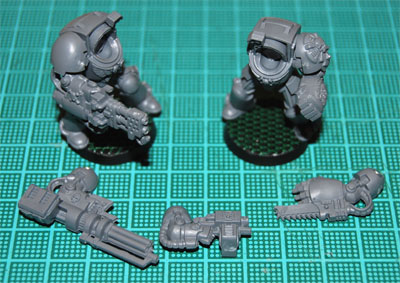 Swappable arms!
Sorry for skipping a month. I didn't plan it like that, but stuff and things, and stuff, got in the way. :)
For april, though, I'm back with an in-depth article about how to let you swap weapons on your Space Marine Terminators. The new plastics are awesome, and you get a lot of options in the box. Why not make sure you can use all of them? (Or most of them, anyway...)
For this project (I'll tell you more about it later), I won't need to be able to swap both arms on every Terminator. So, I'll glue some of the arms, but magnetize some. For instance, I'll have two Terminators with Storm Bolters and the option to swap between Power Fists and Chain Fists. And of course I'll have one Terminator with Power Fist, but with the option of swapping between Storm Bolter, Heavy Flamer and Assault Cannon.
Let's get to it!
The Tools
You'll need some tools to make it all happen:Hobby drill and knife.Drill bits; these are 1.5mm, 2mm and 3.2mm.You need a proper wire cutter. A small cutter like you use to cut bits from sprues just won't "cut it"... :)Notice the difference? Later on in the tutorial, we'll be cutting nails. (Not finger or toe nails!) The smaller cutter would be ruined, and you risk hurting yourself when bits of it breaks off and flies towards your face at high velocity.The Supplies
You'll also need some nails and magnets:Flat headed nails in a couple of different sizes.This is a Neodymium disc magnet from K&J Magnetics. It's tiny but strong! This one is 1/8" x 1/32", and will be used for the arms.This one is even smaller! Also from K&J Magnetics. This one is 1/16" x 1/32", and will be used to hold the shoulder pads in place.Right, unfortunately it's now past my bed time, and I will have to continue another day. Part 2 of this tutorial, where we actually magnetize the Terminators, will be online in a couple of days. No really, I promise!
I know it sucks that I couldn't finish it in time, but I thought it better to give you half a tutorial now, and show you that I still mean business, than waiting even longer before publishing anything at all.
See you soon!
/Stitch
Here's a taste of what's to come:
Swappable arms!
Monday, 16 March 2009
March update delayed even more...
Hey all,
Sorry for the silence this month. A lot of stuff going on and I'm having trouble finding the time right now.
But, an update is on its way, I promise. I'm working on a special project right now, that includes Terminators and lots of small magnets. I'm not gonna promise a date for the update, but I'm aiming for this week.
Thanks for reading!
/Stitch
Sunday, 1 March 2009
March update delayed
Unfortunately, the march update have been delayed. I apologize for that.
Hopefully, it will be online no later than 7 march.
/Stitch
Hopefully, it will be online no later than 7 march.
/Stitch
Sunday, 1 February 2009
February Update
Blimey, is it February already? I haven't had much time for sitting down and building and/or painting, but I have managed to scrape another update together. But first...
I want to thank everyone for reading, and especially I want to thank the guys who took the time to comment on last month's update!
AaronB said:
>>> Great blog, BTW. I use your method on my custom chapter.
Thanks for the positive feedback! I'm glad you enjoy it! So when do we get to see some pictures of your marines, then?
>>> I want the wings on helmet to be slightly tilted out. It's too straight for me.
I did try some different angles for the wings and in the end, I settled for the upright position. I just liked it best, but hey...we can't agree on everything all the time, right? :)
Thanks again, and keep those comments coming!
Gurf said:
>>> Personally I think the winged sword symbol on the chest looks great, I really like the beefy sword as well.
Thanks for commenting! Yeah, I like the winged sword on the chest, too. I wasn't sure about it, but now I think it looks good. Check out the pictures in part 3 of the Building my Company Master series!
>>> But (there's always one! Well almost...) I still think the wings on the helmet look way too big. From the front it kinda makes him look like a rabbit. Not exactly my picture of a heroic SM commander.
Well, see my answer to AaronB, above. ;)
>>> Unless of course it's something along the lines of The Holy grail.
I can imagine the enemies of the Imperium standing there laughing and pointing at the cute rabbit. Which then proceeds to cut their heads off!
Better stock up on some holy hand grenades...
Good thing there's an Orb of Antioch on the Black Templar sprue, then! :O
Looking forwards to hearing what you think of the, almost, finished result!
The Hammer said:
>>> Just want to chime and say Great Blog. Nice step by step on building the models and I really like the way the robes turned out. Well done.
Thanks! Yeah, I like how the robes ended up looking a bit like cracked leather, almost. That gives them a heavier, less dressy look. :)
>>> Almost makes me want to start a Dark Angels force.
No! Don't abandon your Crimson Fists yet! You don't want another unfinished project, right? :)
Yep, I've read your blog, and it looks like we have something in common when it comes to unfinished projects. Same as you, I'm using my blog to encourage me to get at least something done each month.
Your Crimson Fists look good, and I'm looking forwards to seeing more of them!
I encourage everyone to check out Hammer's blog at http://kantorbase.blogspot.com/
Thanks for reading, and keep those comments coming!
As always, if you don't want to leave comments here, you're more than welcome to email me at stitch [at] roll2dice [dot] com.
Best regards,
Stitch
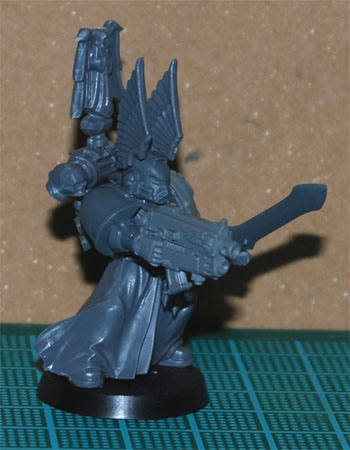
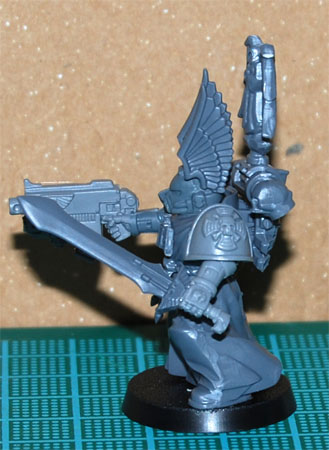
Work in progress: Veteran Sergeant
I promised to show you more of this guy in January's update, but I didn't deliver, did I?
Unfortunately, he's still not finished... But, here are some more work in progress pictures of the Veteran Sergeant of 2nd Tactical Squad 3rd Company:

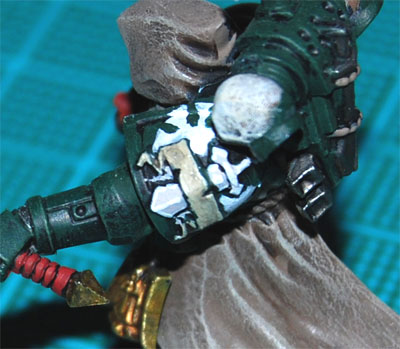
I thought I'd try letting the wings go up over the trim of the shoulder pad, and I'm unsure about the result, but from a distance it looks pretty good. And that's good enough for me. :)
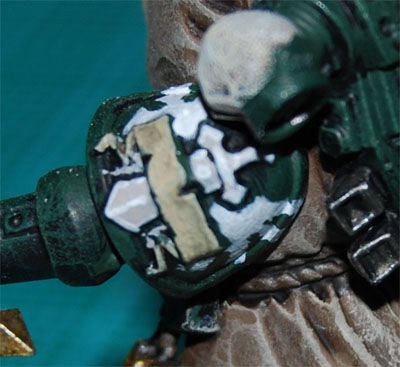
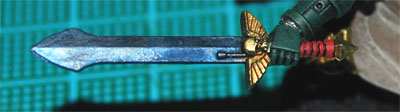
The blade of the power sword didn't quite turn out the way I wanted it, so I may re-paint that, but I'm pretty happy with the gold.
Comments and critiques are welcome, as always!
/Stitch
Unfortunately, he's still not finished... But, here are some more work in progress pictures of the Veteran Sergeant of 2nd Tactical Squad 3rd Company:
I thought I'd try letting the wings go up over the trim of the shoulder pad, and I'm unsure about the result, but from a distance it looks pretty good. And that's good enough for me. :)
The blade of the power sword didn't quite turn out the way I wanted it, so I may re-paint that, but I'm pretty happy with the gold.
Comments and critiques are welcome, as always!
/Stitch
Building my Company Master, part 3: Assembly
Finally, it's time to glue all the bits together!
The first two parts of this series are here:
I hope you'll agree it's the "right" arm... Sorry... I had to...
Here it is with the combi-plasma attached:
Unfortunately, the arm comes with the shoulder pad already on it, so I'll lose the chance of using one of the Dark Angels shoulder pads. Unless I cut it up, and I don't want to do that. I'll try to find something else, or freehand a winged sword on there, or something.
So, after a few dots of plastic glue, here is the result so far:
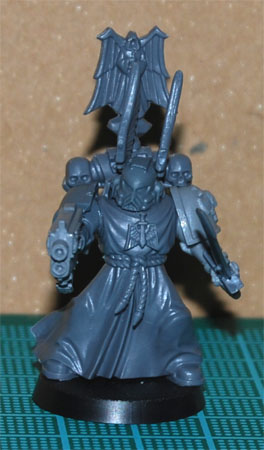
I find it difficult to get good shots of the miniature, but you'll get the idea.
I really think the helmet works, even though the wings are huge. I did fret a little about the icon on the backpack being obscured by them, but the more I look at it, the more I like the mini. He looks beefed up and imposing, and that's how it's supposed to be. I think he'll stand out on the battlefield.
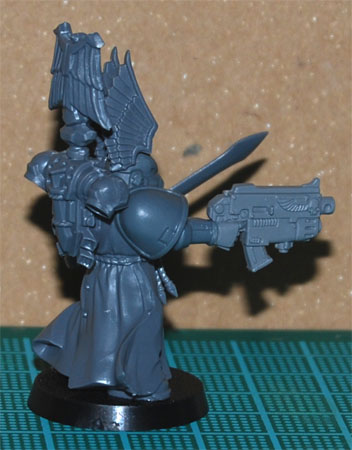
The backpack wasn't glued in place permanently, so I still have the option of going in another direction with it, but I think I may keep it like it is. What do you think?
The first two parts of this series are here:
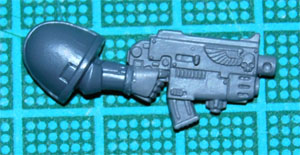
The right arm
If you've read the first two parts, you know I've been having trouble deciding what arm to use. Well, it's finally decided! This right arm comes from the Devastator sprue:I hope you'll agree it's the "right" arm... Sorry... I had to...
Here it is with the combi-plasma attached:
Unfortunately, the arm comes with the shoulder pad already on it, so I'll lose the chance of using one of the Dark Angels shoulder pads. Unless I cut it up, and I don't want to do that. I'll try to find something else, or freehand a winged sword on there, or something.
The Assembly
The assembly went really smooth. Having done a "dry run" (trying the bits together without glue) really helped.So, after a few dots of plastic glue, here is the result so far:
I find it difficult to get good shots of the miniature, but you'll get the idea.
I really think the helmet works, even though the wings are huge. I did fret a little about the icon on the backpack being obscured by them, but the more I look at it, the more I like the mini. He looks beefed up and imposing, and that's how it's supposed to be. I think he'll stand out on the battlefield.
The backpack wasn't glued in place permanently, so I still have the option of going in another direction with it, but I think I may keep it like it is. What do you think?
Subscribe to:
Comments (Atom)